Workflows

During the lifecycle of a document, different contributors can change, edit, and make different decisions on the document. It is important that each person that participates in the process knows their responsibilities and the working stages.

The M-Files workflows let you model document lifecycles to real world processes. The workflows are divided into states that represent the working stages of the document or other object.

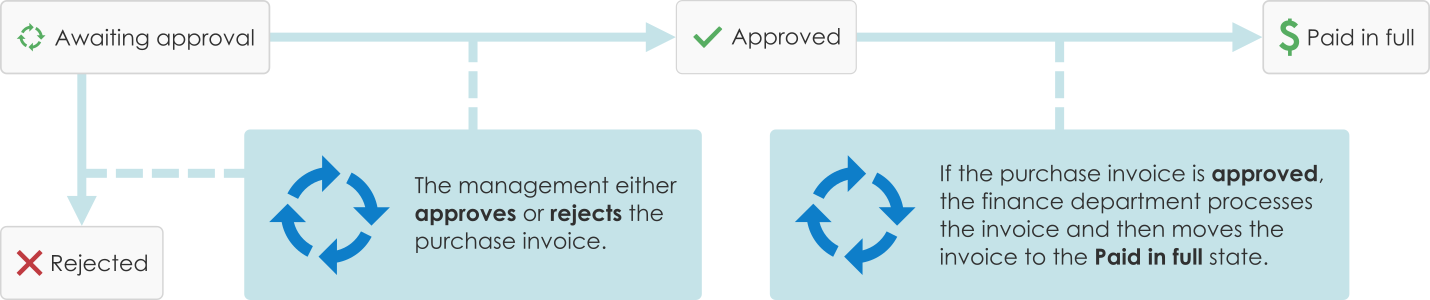
Workflows make routine tasks of the organization easier. For example, processing purchase invoices.

Workflows are created and changed in M-Files Admin by M-Files system administrators. To create and edit workflows, see Configuring Workflows.

To select a workflow and a workflow state for an object, use the workflow controls on the metadata card.

Changing the Workflow State on the Metadata Card

  1. Select an object in the listing area.
  2. Click the workflow state field at the bottom of the metadata card.
  3. Select the workflow state.
    Result:The Change State dialog is opened.
  4. Optional: In Comment, add comments about the state transition to the object.
  5. Select one of these options:
    OptionDescription
    OK The state transition is made and the possible comment is added.
    Cancel The state transition is made but no comment is added.
    Result:The Change State dialog is closed.
  6. Click Save.
  7. Optional: If the Electronic Signature dialog is opened, complete one of these steps:
    • If the Username and Password fields are shown, enter your user credentials and click Sign.
      or
    • If the Username and Password fields are not shown, click Sign to enter your user credentials.

Changing the Workflow State with the Context Menu

  1. In the listing area, right-click an object and click Workflow > Change State.
    Result:The Change State dialog is opened.
  2. In State Transition, select the workflow state.
  3. Optional: In Comment, add comments about the state transition to the object.
  4. Click OK.
    Result:The Change State is closed and the state transition is made.
  5. Optional: If the Electronic Signature dialog is opened, complete one of these steps:
    • If the Username and Password fields are shown, enter your user credentials and click Sign.
      or
    • If the Username and Password fields are not shown, click Sign to enter your user credentials.

Changing the Workflow State in the Task Area

  1. In the listing area, select an object that has a workflow.
  2. In the task area, click the new state in the State transition section.
    Result:The Change State dialog is opened.
  3. Optional: In Comment, add comments about the state transition to the object.
  4. Click OK.
    Result:The Change State is closed and the state transition is made.
  5. Optional: If the Electronic Signature dialog is opened, complete one of these steps:
    • If the Username and Password fields are shown, enter your user credentials and click Sign.
      or
    • If the Username and Password fields are not shown, click Sign to enter your user credentials.