The annotation options are shown in the Alt menu and in the task area on the left-hand side of the M-Files Desktop user interface.
Video: Annotations
Enabling annotations in the user interface
- Open M-Files Desktop and access your vault.
- Press the Alt key on your keyboard.
- Open the View menu.
- Enable the Show Annotations option.
Creating a new annotation object
- Select a document in suitable format (for instance, a .doc or .pdf).
- Make sure the Preview tab (not, for example, the Metadata tab) is selected in the right pane.
- Select the New Annotations command via the task area on the left-hand side of the user interface.
This should create a new Annotation object under your document, visible via the listing view, and open the annotation toolbar in the preview window.
Adding annotations
The annotation toolbar includes a number of different ways for you to highlight parts of the document.
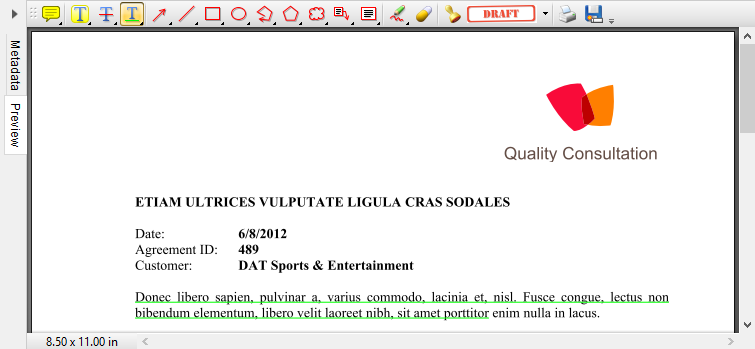
The annotation toolbar in the preview window.
You can add comments as well as text emphasis in the form of text highlighting, strikethrough text and text underlines. You can also add arrows, lines, rectangles and various other shapes for emphasis, including text boxes. In addition to these elements, there is a pencil tool coupled with an eraser in case you make a mistake. Finally, you can add various built-in stamps, such as "Draft", "Approved" or "Final".
Saving and printing annotated documents
The toolbar also displays icons for printing and saving. You can use these functions to print the annotated document or to save a copy to people with no access to your document vault. Saving a copy is also a convenient way for embedding all the annotations to a single PDF file.
Saving annotations
Once you have finished making annotations, you can save your changes by selecting the Save Annotations option via the task area. Alternatively, you can select another document, which triggers M-Files to ask if you want to check in the annotated document. The modifications are saved once the document has been checked in.
Editing annotations
- Select the annotated document or the annotation object.
- Make sure the Preview tab is active.
- Select Edit Annotations via the task area.
This should open the annotation toolbar in the preview window.
Showing and hiding annotations
When you have an annotated document selected, the task area should display the options to display or hide the annotations.
To hide the annotations, select the Hide Annotations option via the task area. Alternatively, select the Show Annotations if they are not visible.