Named Access Control Lists

A named access control list is a list of permissions that can be attached to an object. It is a list consisting of one or more subjects (users, user groups, or pseudo-users) and operations (delete, edit, read, or change permissions) that are either allowed or denied to those particular subjects. Named access control lists make managing permissions in M-Files very quick and effortless.

Video: Named Access Control List Permissions

Creating a New Named Access Control List

Steps

  1. Open M-Files Admin.
  2. In the left-side tree view, expand the desired connection to M-Files Server.
  3. In the left-side tree view, expand the document vault of your choice.
  4. Still in the left-side tree view, select the Named Access Control Lists node.
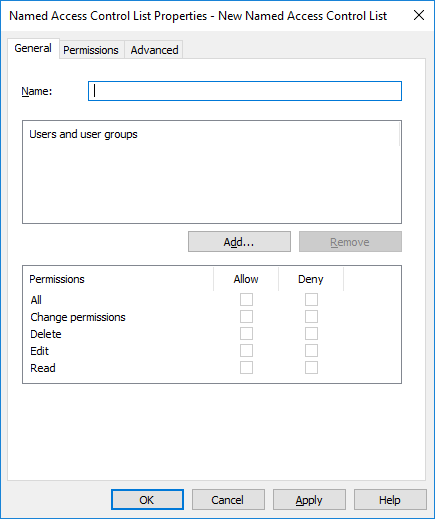
  5. Click New Named Access Control List... on the task area.
    The Named Access Control List Properties dialog is opened.
  6. In the Name field, enter a descriptive name for the named access control list.
    It is recommended to name the named access control list according to the members of the list and the permissions given to them, such as Visible to company management only or Full control for all internal users.
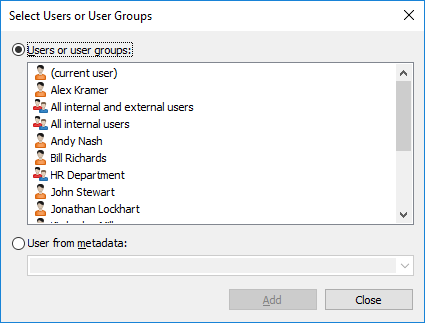
  7. Click Add... to add users or user groups to this named access control list.
    The Select Users or User Groups dialog is opened.
  8. Select either:
    1. The Users or user groups option and select the users or user groups that you wish to add to this named access control list.
      Note: You can select more than one item at once by holding down the Ctrl key to select multiple individual items or by holding down the ⇧ Shift key to select adjacent items on the list.
      or
    2. The User from metadata option and use the drop-down menu to select the property containing users or user groups on the basis of which permissions are granted. For more information, see Pseudo-users.
  9. Click Add to add the selected users or user groups to the named access control list and to close the Select Users or User Groups dialog.
  10. Back in the Named Access Control List Properties dialog, select the user or user group whose permissions you want to adjust from the Users and user groups list.
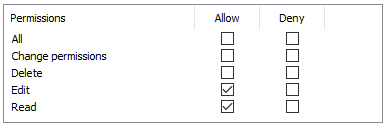
  11. Select the permission that you want to adjust and check either:
    1. The Allow option check box if you want to allow the selected permission for the user or user group.
      or
    2. The Deny option check box if you wanto to deny the selected permission for the user or user group.
  12. If you want to adjust additional permissions, repeat the steps 10 and 11.
  13. Optional: On the Permissions tab, you can specify the users who can see this named access control list.
  14. Optional: On the Advanced tab, you can specify an alias for the named access control list. For more information, see Associating the Metadata Definitions.
  15. Click OK to finish creating the named access control list.

Results

The new named access control list containing a set of permissions can now be attached to an object using the permission control on the metadata card.

Modifying Named Access Control Lists

When you modify a named access control list, the modified permissions are applied to either new and existing objects to which the named access control list is already attached or to new objects only, depending on your choice.

Steps

  1. Open M-Files Admin.
  2. In the left-side tree view, expand the desired connection to M-Files Server.
  3. In the left-side tree view, expand the document vault of your choice.
  4. Highlight the Named Access Control Lists node.
    The list of named access control lists in the selected vault is opened in the right-side pane.
  5. In the Named Access Control Lists list, right-click the item that you want to edit and select Properties from the context menu.
    The Named Access Control List Properties dialog is opened.
  6. Optional: On the General tab, click Add... if you wish to add a new user or user group to this named access control list.
  7. Select the user or user group whose permissions you wish to adjust from the Users and user groups list.
  8. Depending on your choice, select either the Allow or Deny option for the desired operations.
  9. Click OK once you are done to close the Named Access Control List Properties dialog.
  10. Optional: If the selected named access control is already used in the permissions of one or more objects, the Confirm Update dialog is opened.
    1. Click Change Objects' Permissions if you wish to apply your changes to the permissions of existing objects that use the selected named access control list in their permissions.
      or
    2. Click Preserve Objects' Permissions if you do not wish to apply your changes to the permissions of existing objects that use the selected named access control list in their permissions.

Results

The changes you have made are to the named access control list are saved and applied, depending on your choice, to new and existing objects that employ the selected named access control list or to new objects only.