Importing Content

After creating an export package, you can import its content to a vault of your choosing. You can use the Import Content function when you need to import data to another vault for example for replication, publication, archiving, or backup purposes. The objects and their metadata are imported and synchronized with those in the target vault. M-Files always imports versions that are new or changed compared to the current versions in the target vault.

Complete the following steps to import a content package:

Steps

  1. Open M-Files Admin.
  2. In the left-side tree view, expand the desired connection to M-Files Server.
  3. In the left-side tree view, expand the document vault of your choice.
  4. Still in the left-side tree view, select the Content Replication and Archiving node.
    The content replication and archiving features are displayed in the right-side pane.
  5. Click the One-time Import... button.
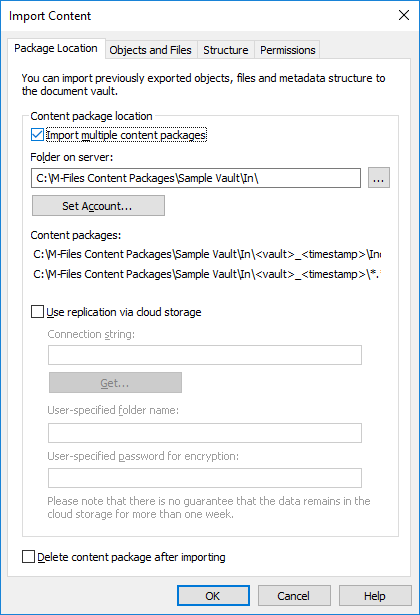
    For information about creating a recurring import operation, see Defining a Scheduled Import.
    The Import Content dialog is opened.
  6. On the Package Location tab, define the location for the content package.
    1. Optional: Enable the Import multiple content packages if you want to import multiple packages from the selected location.
    2. Click the ... button to define the location of the content packages to be imported.
    3. Optional: Click Set Account... to define the user account to be used for retrieving the content package from the selected folder.
      You need to use a user account that has read permissions to the selected folder.
  7. Optional: Still on the Package Location tab, enable the Use replication via cloud storage option to import from a cloud storage location.
    1. In the Connection string field, enter the provided connection string for connecting to the cloud storage.
      If you do not yet have the connection string, click Get... to obtain one. This opens up a preformatted e-mail message to be mailed to M-Files customer support.
    2. In the User-specified folder name field, enter a folder location in the cloud storage that will be used for importing to one vault and exporting from another.
    3. In the User-specified password for encryption field, enter a password of your choice that will be used for encrypting content packages. The same password must be used for exporting and importing the same packages.
  8. Check the Delete content package after importing check box if you want the content package to be removed after the operation has been completed.
  9. On the Objects and Files tab, you can specify how objects and files are imported.
    For more information, see Import Objects and Files.
  10. On the Structure tab, you can specify how metadata structure is imported.
    For more information, see Import Structure.
  11. On the Permissions tab, you can specify the permission settings for the imported objects.
    For more information, see Permissions (Importing Content).
  12. Click OK to start the import operation.
    A summary of the package content to be imported is opened.
    Important: It is essential to take into consideration that exporting and importing objects with relationships to other objects may, in some cases, produce a conflict. If the conflict cannot be resolved automatically, some of the selected objects might not be replicated. The import summary report should be reviewed carefully before proceeding with the import operation.